

This procedure describes how to use AutoTrigger to set up your ignition for Dual Spark mode with a toothed wheel trigger as used in MicroSquirt® and Sequencer™. AutoTrigger has been added to the 3.600+ code versions. With AutoTrigger this is now an easy procedure, with only one variable requiring setting, the Trigger Offset. This variable tells the ECU where the crank position sensor is located relative to the missing tooth gap, or cam synch pulse if there is no missing tooth. Anything else needed by the ECU, for example tach pulse spacing, is calculated from normal engine parameters such as number of cylinders, number of crank wheel teeth, etc.
Before starting, make sure the AutoTrigger option is enabled under the Dual/Multi Spark Options menu in TunerStudio.
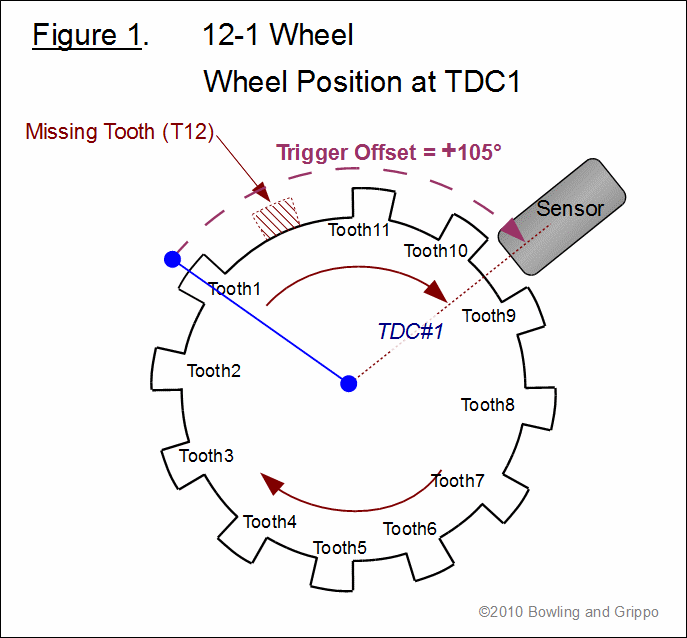
Figure 1 shows a crankshaft mounted trigger wheel as viewed facing the front of the wheel. The figure represents a snapshot when the engine is at TDC of cylinder 1 compression stroke. The arrows on the wheel indicate the normal direction of rotation when you crank the engine.
Tooth no. 1 is:
This tooth is always numbered T1 and is the tooth at which wheel synch is declared – you cannot declare it any sooner with just an M-N wheel/ M-0 with cam.
What you need to do to configure the ECU is:
For example, in Figure 1, you start at the center of tooth 1 and count clockwise about 3½ teeth, including the missing tooth, to get to the center of the sensor. For the wheel shown, with 12 nominal teeth in 360° or 30°/tooth, this represents 105°, and that is what should be entered for Trigger Offset. From this the ECU will automatically calculate the positions of the tach pulses for each cylinder, checking that no tach pulse falls in the missing tooth gap.
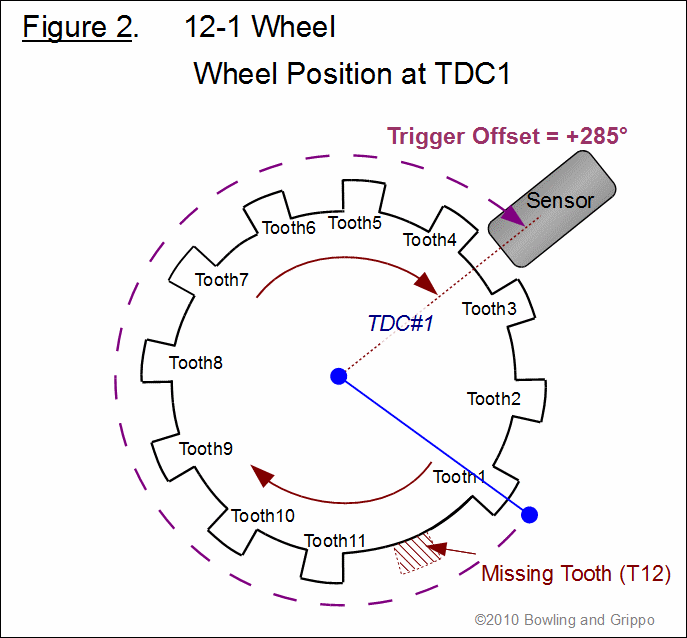
Figure 2 illustrates another example with tooth 1 having much more separation from the sensor. In this case it is about 9½ teeth or 285°.
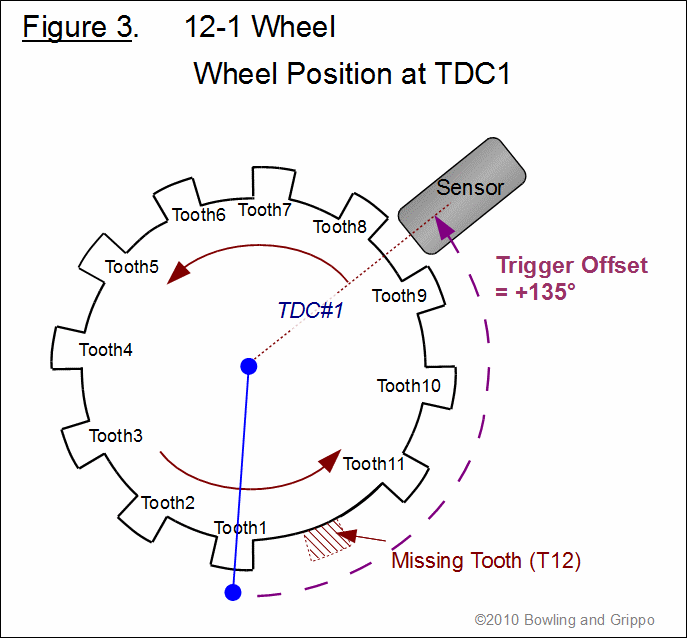
Figure 3 shows the same example, but with the wheel normally turning in the counterclockwise direction when facing the front of the wheel. So in this case the teeth are numbered in the counter-clockwise (CCW) direction, because tooth 1 is by definition the first tooth AFTER the missing gap. Starting from tooth 1 and going CCW, we count 4½ teeth or 135°.
For odd fire engines the same procedure is followed, just as if it were an even-fire engine, except you additionally need to set the Odd Angle (Output 2 (second bank) Offset) to a positive advance if the second output fires earlier than it would if the engine were even fire, and set to retard (minus advance) if it fires later.
There are several aspects to this and they are summarized in Table 1 and Figure 4.
Wheel Type | MicroSquirt® | Sequencer™ |
| M-N Crank Wheel | Cam synch must fall between Cam_Tooth and Tooth 1, where Cam_Tooth is defined in Fig. 4.
Cam_Tooth = 0 | |
| M-0 Crank Wheel | Tooth 1 is defined as the first tooth after cam synch. This tooth must remain consistent throughout the rpm, load range. Cam_Tooth = 0 | |
For the case where the wheel does have a missing tooth/teeth, if you can, get your cam synch to fall in the missing tooth gap, and ensure it will remain there throughout your rpm and load range.
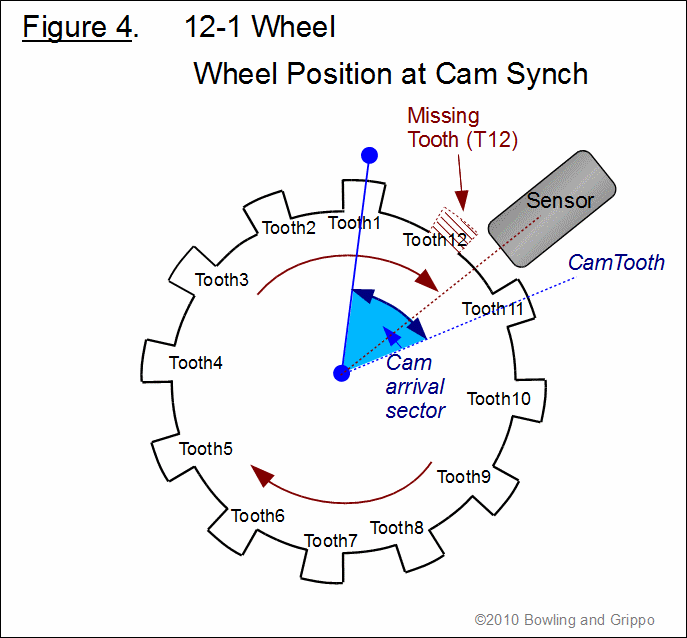
The missing tooth gap in Figure 4 is the gap between tooth 11 arrival at the sensor and tooth 1 arrival, so cam synch must arrive after tooth 11 and before tooth1. Cam sync must arrive in the gap with 3 and 5 cylinder Sequential engines, and also set Cam_Tooth to 0, meaning it is not used. But you can get away with a lot more slop with 2, 4, 6 and 8 cylinder Sequential. In Figure 4 this means you could select Cam_Tooth to be 11, 10 or any lower number tooth.
The Cam_Tooth should be selected to give plenty of tolerance for cam and timing belt/ chain flex and accel/decel stresses. Tooth 11 would be a suitable choice for the 12 tooth wheel (it gives a 30° 'window'), but for a high tooth count wheel you would want to pick a Cam_Tooth giving a wider cam synch arrival sector than just a few narrow teeth. On the other hand, the smaller the sector the less probability there is of noise triggering a false signal.
In those configurations in which Cam_Tooth is used, the ECU will start the engine off in a temporary wasted spark mode, meaning it fires 2 coils and 2 injectors after each cylinder tach event. After it has verified consecutive 8 cam synch 'events', then the ECU switches to sequential mode – one spark, one injection per cylinder per 720 crank degrees (two revolutions) – and no longer looks at cam synch. The 8 cam sync events consist of one rev with cam synch between Cam_Tooth and Tooth 1, one rev without cam synch in that sector, consecutively for a total of 8 crank revs, then the ECU switches to sequential mode - one spark, one injection per cylinder per 720 crank degrees - and no longer looks at cam synch.
Step-by-Step Procedure for Configuring
Auto Trigger: Auto Trigger is a user input, but is also a setting in Tuner Studio. Both of these are set by default, but if upgrading to the new software and you are not sure what is set, do the following:
One other caution when adjusting the trigger offset. To avoid increasing processor load it is sometimes necessary to resync the engine to make sure the trigger offset you want has been propagated to all the variables it affects. You only have to stop the engine, but you can maintain ECU power and TunerStudioMS connection. Generally if your trigger offset is < 180 deg, you can move trigger offset up or down and match the advance with your timing light without needing to resync the engine; if you are in the > 180° sector, it is okay to increase trigger offset, but if you decrease it, you might have to resync the engine. This is rare, especially for small changes. The way to tell is if your timing light does not respond the way you expect to a change in trigger offset. For example, you add 5° to the trigger offset and see no change on the timing light, then try stopping and restarting the engine. Once you have the final timing, check it one more time by stopping/restarting the engine.
MAP/MAF Sampling Point: There are two considerations for sampling the MAP sensor output. The first is to sample at the same point in the cylinder cycle each time to obtain the best stability. The manifold pressure can vary significantly over the engine cycle even when engine rpm and load, and hence mass air into the cylinder, are constant. The second consideration is when to sample. For MAP this will be at the bottom of the intake stroke, because at that point the pressure in the cylinder and in the manifold is approximately equal, so applying the Ideal Gas Law will give a correct value for the air mass in the cylinder. Note that it is only necessary to use one sample point. Multiple sample points do not increase value accuracy due to the fact that the hardware anti-aliasing filter has a time constant of roughly 1.3 ms, matching the response time of the MAP sensor itself, so repeated quick samples does not increase accuracy. Furthermore, MAP sensor output accuracy is in the 1 kPa range, and there are cycle to cycle mass air filling variations that also affect accuracy.
For MAF sampling there is also variation of air flow over the engine cycle, depending on how far the sensor is from the throttle plate. The air is ingested over the intake stroke, so ideally one would want to sample over the entire stroke and add up the samples and average them. This takes a lot of ECU processor time and, because of a mathematical theorem (mean value theorem), is not necessary. The theorem says that there is some point in the cycle at which the sample value is the same as the value you would obtain by averaging the samples over the whole intake stroke. To a first approximation, this would be the midpoint of the intake stroke, but you can experiment with what sample point gives the best match to the measured AFR. The most accurate way to do this is to use a narrow band sensor and enter a stoichiometric AFR target, but leaving the system in open loop, then adjust the MAF sample point until you get best match to a stoichiocmetric air/fuel mixture.
With the latest software entering the MAP and MAF sample points is easy. Go to TunerStudioMS “Other Fuel Setup” menu and select “Sampling and Smoothing”. You enter the two values in degrees relative to TDC of cylinder 1 compression stroke. If we take TDCC1 as 0°, then from the engine timing diagram in Figure 5 it should be clear how to do this:
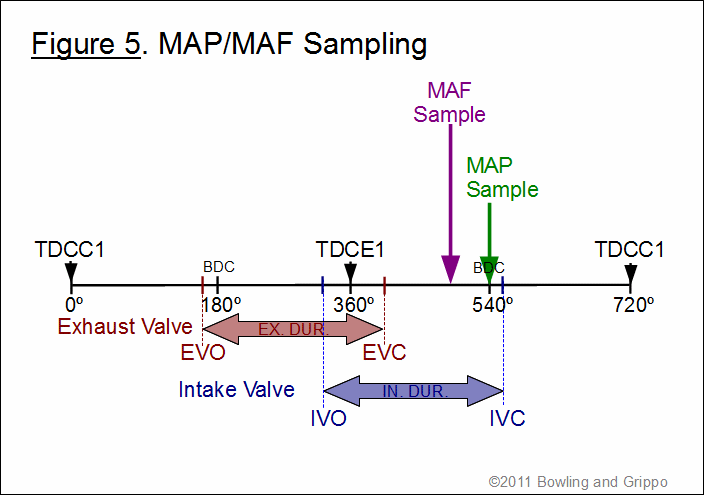
Representative sample points are illustrated, 450° being the half-way point of the intake stroke for MAF sampling, and 540° being BDC of the intake stroke for MAP sampling.
Fuel Injection Timing: The most important consideration for injection timing is to avoid the overlap period during which both intake and exhaust valves are open. When you can accurately control the timing, a noticeable drop in idle quality is apparent as you move the injection timing into this region. Outside this region it is not obvious to the ear what is going on, but the vast majority of modern cars with individual port injection are set up with injection on the closed intake valve. The heat from this valve atomizes the fuel charge and, since it will not enter the cylinder until about 500° later, when the intake valve next opens, it has plenty of time to mix with the air. The result is a higher quality charge, less emissions, and a leaner mix is possible since less fuel is wasted. Power does not suffer, and the engine lives longer, since fuel is not washing down the cylinder walls, as happens when fuel is injected into a wide open valve. While it may appear that the pulse width becomes "e;stale"e; waiting this long during acceleration/ deceleration, MAP trending is used to correct for at least some of this ahead of time.
Adjusting fuel timing is similar to adjusting MAP/MAF sampling, and should be done after the latter is done. In auto trigger mode, go to the Fuel Settings menu in TunerStudioMS and select General, then adjust Injection Timing Angle (deg). The meaning for this setting is exactly the same as for MAP/MAF sampling, except it adjusts the starting point of fuel injection relative to the TDCC1 point, which is taken as 0°. The default setting of 580° should work for most people. Studies have shown that there is no significant change in power from 510° to 720° and wrapping around to 0-270°. It is only around the overlap region, from 270° to 510°, that there is a significant loss in performance and increased emissions. The bottom line is that injection timing does not need to be a precision adjustment.
Because of the way the ECU code works, a fuel pulse width is sent once each tach cycle, and you cannot delay the injection so much that the injection starts with less than 2 milliseconds remaining before the end of the tach cycle. This 2 milliseconds allows for prediction error for when the next tach cycle will occur, plus interrupt latency and pulse width calculation time. This is very conservative, but if the next tach were to arrive before the pulse width is sent, there would be NO fuel sent, much more serious than not getting the desired timing. If one were moving the fuel timing and observing it on a scope relative to a tach pulse reference, one would see it move from start of tach toward the next tach as you increased the timing. But at some point, depending on the rpm, you would see it stop moving even though you increased the timing. This is because it hit the 2 ms mark, which for low rpm will be very close to the start of the next tach pulse, but for very high rpms, especially with a large number of cylinders, it could stop half-way through the tach cycle.
Odd-fire Engines: Auto Trigger should work fine for odd-fire engines as far as spark timing is concerned, as long as the odd angle offset for the second bank is entered properly (positive if second bank is advanced relative to first, and negative if retarded). The setting for this in TunerStudioMS is in the Ignition Settings menu, Dual Spark Options, Offset for output #2.
MAP and MAF sampling does not currently account for the odd-fire angle, so that sampling on bank 2 cylinders will not correspond to trhe same engine position on bank 1 cylinders. Because of this it is likely that map readings will exhibit a wide variation. To prevent this, for odd-fire engines only, map sampling is only done on each bank 1 cylinder and the same value used for the corresponding bank 2 cylinder.
Fuel injection timing is adjusted for odd-fire, but there are limitations on the possible injection timing window, if you want the injections to be the same relative to each cylinder’s TDC. The timing used for the second (odd) bank injectors is (Injector Timing Angle – Odd Angle Offset), where the net value must be 0° or greater. This is because the tach point for each engine bank remains as for an even fire engine. So, if the second bank is advanced, it is forced to have a timing delay of at least Odd Angle° because the earliest it can inject is at the tach point, Odd Angle degrees after TDC. So the first bank must be delayed at least Odd Angle degrees, if you want both injections to be the same number of degrees ATDC. This is illustrated in Figure 6a below.
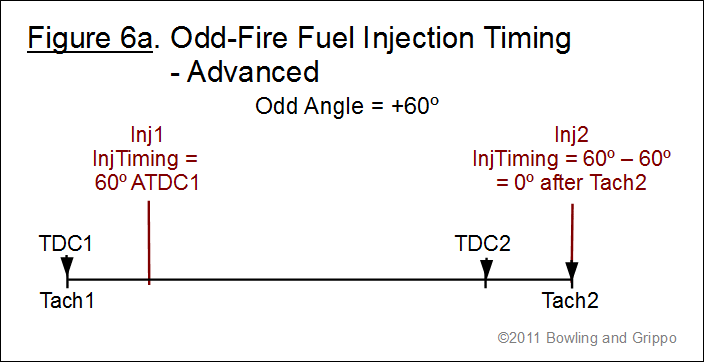
There is no such restriction if the second bank is retarded, but then it will reach the “2 ms before next tach point” limit earlier than first bank injectors (see Figure 6b).
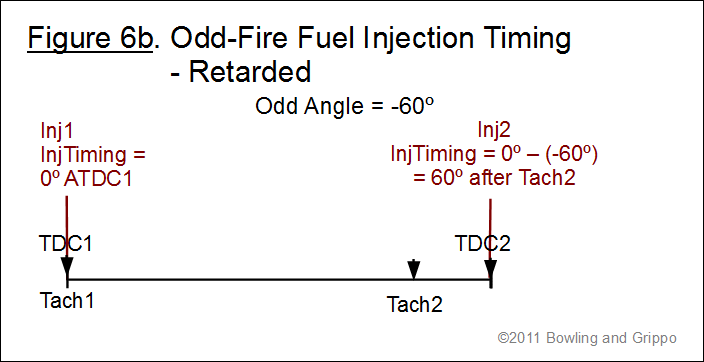
Note that it is possible to switch cylinders, for both spark and fuel, to obtain more flexibility in where the fuel timing occurs.
Two-Stroke Engines: Auto Trigger has been tested and should work fine for two-stroke engines. Use the Single Cam Wheel option under Ignition Settings/Dual/MultiSpark Options in TunerStudioMS. Note that timing is from 0 to 360 in camshaft degrees, so do not enter any angles greater than 359.9 degrees.